10. A structure-structure interaction simulation with preCICE and CalculiX#
Load tutorial into dapta app.
View files on Github.
Duration: 45 min
In this tutorial we explore the usage of the preCICE multi-physics simulations library with a simple partitioned elastic beam example. We run a structure-structure interaction simulation with CalculiX running on both sides and then automate the post-processing of the output files for visualisation.
This tutorial is based on the Partitioned elastic beam preCICE tutorial.
10.1. What is preCICE?#
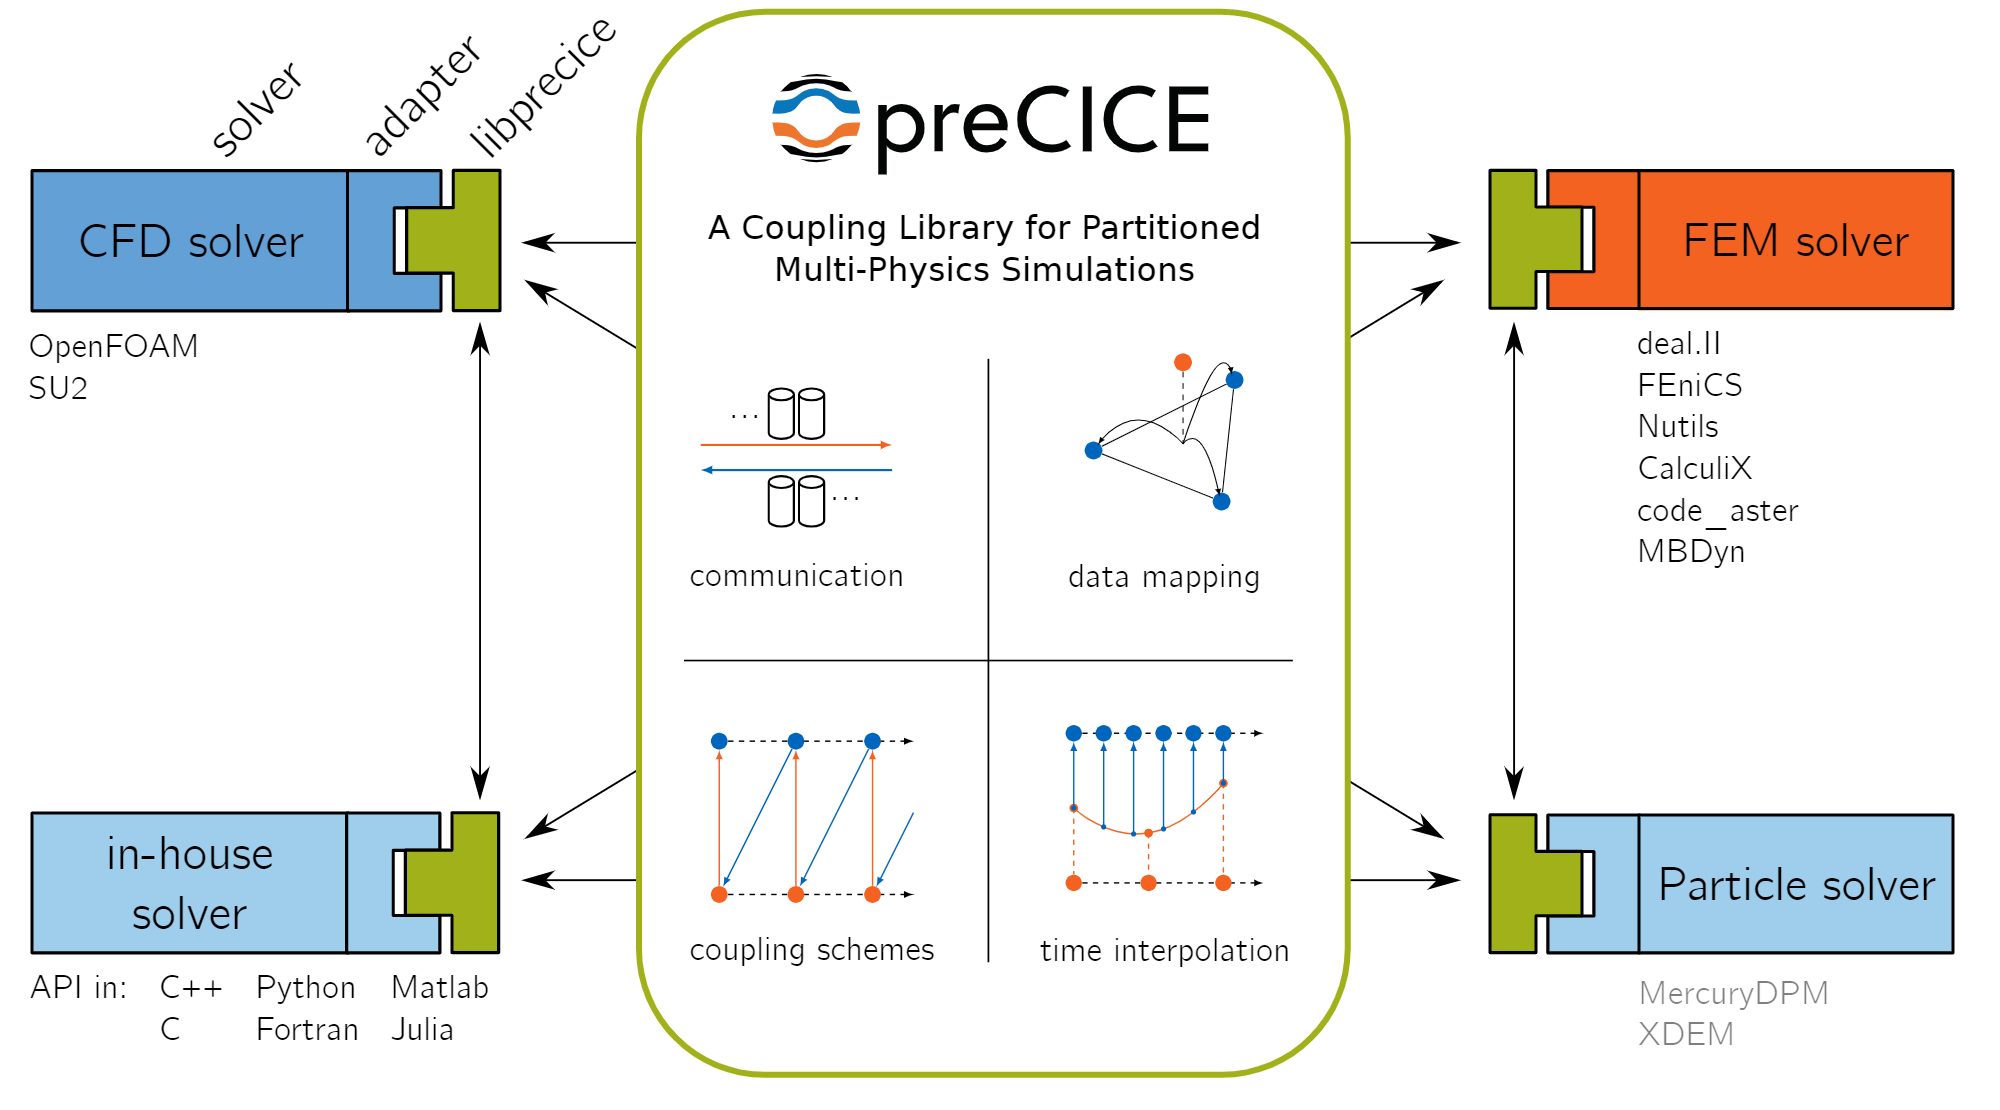
preCICE stands for Precise Code Interaction Coupling Environment. Its main component is a library that can be used for partitioned multi-physics simulations, including, but not restricted to fluid-structure interaction and conjugate heat transfer simulations. Partitioned (as opposite to monolithic) means that preCICE couples existing programs (solvers) which simulate a subpart of the complete physics involved in a simulation.
The main elements of the preCICE library are shown in the following figure and include: communication, data mapping, coupling schemes and time interpolation. Read the preCICE docs to find out more about preCICE and how to use it.
10.2. Beam model description#
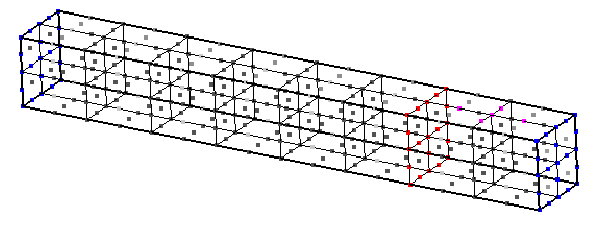
We have a rectangular linear elastic beam of dimensions 1 x 1 x 8 m, divided in two subdomains by a splitting plane at z = 6 m. This plane corresponds to the coupling surface. Both ends of the beam (z = 0 and z = 8 m) are fixed. A mechanical load F = -0.001 N is applied constantly along the y-axis onto a small set of nodes near the end of the beam. These boundary conditions can be seen in the input files beam
10.3. Create the Components#
10.3.1. Beam-1#
This component simulates the structural dynamic behaviour of the first beam subdomain (from z = 0 to z = 6 m).
Create the component:
Right-click in the workspace and select
Add Empty Node. Select the empty component to edit it.In the
Propertiestab, fill in the component name,beam-1, and select the preCICE-CalculiX component APIprecice-calculix-comp:latest.Copy the contents of the
setup.pyandcompute.pyfiles from below into a text editor, save them locally. Then upload them under thePropertiestab.In the
Propertiestab check the box next to theStart Nodeoption.Copy the contents of the parameters JSON object below into the
Parameterstab text box.From github download copies of the preCICE configuration file precice-config.xml and of the zip folder with the CalculiX mesh files part_1.zip. Then upload these two files under the
Parameterstab by selectingupload user input files.Copy the following JSON object into the
Outputstab text box:
{
  "dummy_output": 0,
  "files.beam_frd": "default"
}
Select
Save datato save and close the component.
import shutil
from datetime import datetime
import zipfile
from pathlib import Path


def setup(
    inputs: dict = {"design": {}, "implicit": {}, "setup": {}},
    outputs: dict = {"design": {}, "implicit": {}, "setup": {}},
    parameters: dict = {
        "user_input_files": [],
        "inputs_folder_path": "",
        "outputs_folder_path": "",
    },
) -> dict:
    """A user editable setup function."""

    # unzip the analysis input files into run folder
    inputs_folder = Path(parameters["inputs_folder_path"])
    run_folder = Path(parameters["outputs_folder_path"])
    for file in parameters["user_input_files"]:
        src = inputs_folder / file["filename"]
        if src.suffix == ".zip":
            print(f"Unzipping {file['filename']} into local component outputs folder.")
            with zipfile.ZipFile(src, mode="r") as f:
                f.extractall(run_folder)
        else:
            shutil.copy(src, run_folder / src.name)

    if not (run_folder / "precice-config.xml").is_file():
        raise ValueError("Missing precice configuration 'precice-config.xml'.")

    # make frd file accessible for post-processing
    outputs["implicit"]["files.beam_frd"] = parameters["beam_frd"]

    message = f"{datetime.now().strftime('%Y%m%d-%H%M%S')}: Setup completed."
    print(message)

    return {"message": message, "outputs": outputs}
import shutil
from datetime import datetime
from pathlib import Path

from precice import run_ccx_preCICE


def compute(
    inputs: dict = {"design": {}, "implicit": {}, "setup": {}},
    outputs: dict = {"design": {}, "implicit": {}, "setup": {}},
    partials: dict = {},
    options: dict = {},
    parameters: dict = {
        "user_input_files": [],
        "inputs_folder_path": "",
        "outputs_folder_path": "",
    },
) -> dict:
    print("Compute started.")

    # get components inputs
    run_folder = Path(parameters["outputs_folder_path"])

    if not "ccx_precice" in parameters:
        raise ValueError(
            "Missing required ccx_precice parmeter dictionary with keys 'infile', 'participant' and 'env'."
        )

    infile = parameters["ccx_precice"]["infile"]
    participant = parameters["ccx_precice"]["participant"]
    env = parameters["ccx_precice"]["env"]
    subfolder = parameters["ccx_precice"]["subfolder"]

    resp = run_ccx_preCICE(
        infile=run_folder / subfolder / infile,
        run_folder=run_folder / subfolder,
        participant=participant,
        env=env,
    )
    with open(run_folder / f"ccx_precice_{participant}.log", "w") as f:
        f.write(resp["stdout"])
    if not resp["returncode"] == 0:
        raise ChildProcessError(
            f'ccx_precice returned non-zero exit status {resp["returncode"]}'
        )

    if not (run_folder / subfolder / parameters["beam_frd"]).is_file():
        raise FileExistsError(f"output file {parameters['beam_frd']} doesn't exist.")

    print("Executed CCX FEM analysis.")

    message = f"{datetime.now().strftime('%Y%m%d-%H%M%S')}: Compute completed."

    return {"message": message, "outputs": outputs}
{
  "beam_frd": "beam1.frd",
  "ccx_precice": {
    "env": {
      "CCX_NPROC_EQUATION_SOLVER": "1",
      "OMP_NUM_THREADS": "1"
    },
    "infile": "beam1.inp",
    "participant": "Calculix1",
    "subfolder": "part_1"
  }
}
10.3.2. Beam-2#
This component simulates the structural dynamic behaviour of the second beam subdomain (from z = 6 to z = 8 m).
Create the component:
Right-click in the workspace and select
Add Empty Node. Select the empty component to edit it.In the
Propertiestab, fill in the component name,beam-2, and select the preCICE-CalculiX component APIprecice-calculix-comp:latest.The
setup.pyandcompute.pyfiles are identical to the files from the beam-1 component. Upload them again here under thePropertiestab.Copy the contents of the parameters JSON object below into the
Parameterstab text box.From github download a copy of the zip folder with the CalculiX mesh files part_2.zip. The preCICE configuration file precice-config.xml is identical to that from the previous component. Upload these two files under the
Parameterstab by selectingupload user input files.Copy the following JSON object into the
Inputstab text box:
{
  "dummy-in": 0
}
Copy the following JSON object into the
Outputstab text box:
{
  "files.beam_frd": "default"
}
Select
Save datato save and close the component.
{
  "beam_frd": "beam2.frd",
  "ccx_precice": {
    "env": {
      "CCX_NPROC_EQUATION_SOLVER": "1",
      "OMP_NUM_THREADS": "1"
    },
    "infile": "beam2.inp",
    "participant": "Calculix2",
    "subfolder": "part_2"
  }
}
10.3.3. Post-processing#
This component runs only after the coupled structure-structure interaction simulation completes.
It joins the .frd output files from both beam simulation participants to form a new file with the entire beam.
The output can be visualised in CalculiX GraphiX as described in the Inspect the outputs section.
Create the component:
Right-click in the workspace and select
Add Empty Node. Select the empty component to edit it.In the
Propertiestab, fill in the component name,post-processing, and select the generic python component APIgeneric-python3-comp:latest.Copy the contents of the
setup.pyandcompute.pyfiles from below into a text editor, save them locally. Then upload them under thePropertiestab.In the
Propertiestab check the box next to theEnd Nodeoption.Copy the following JSON object into the
Inputstab text box:
{
  "files.beam1_frd": "default",
  "files.beam2_frd": "default"
}
Select
Save datato save and close the component.
from datetime import datetime


def setup(
    inputs: dict = {"design": {}, "implicit": {}, "setup": {}},
    outputs: dict = {"design": {}, "implicit": {}, "setup": {}},
    parameters: dict = {
        "user_input_files": [],
        "inputs_folder_path": "",
        "outputs_folder_path": "",
    },
) -> dict:
    """A user editable setup function.

    Parameters
    ----------
    inputs: dict
        The component Inputs sorted by type (design, implicit or setup).
    outputs: dict
        The component Outputs sorted by type (design, implicit or setup).
    parameters: dict
        The component Parameters as defined in the component 'Parameters' tab.
        Includes the following special keys:
        'user_input_files': list of user-uploaded input file filenames
        'inputs_folder_path': path to all user and connection input files (str)
        'outputs_folder_path': path to component outputs folder (str)

    Returns
    -------
    dict
        dictionary of JSON-serialisable keys and values, including:
        inputs: dict, optional
            The setup function can assign values to input keys, but the inputs
            keys should not be modified.
        outputs: dict, optional
            The setup function can assign values to output keys, but the outputs
            keys should not be modified.
        parameters: dict, optional
            The setup function can add key/value pairs to the parameters dict,
            but the existing key/value pairs cannot be modified.
        partials: dict, optional
            The derivatives of the component's "design" outputs with respect to its
            "design" inputs, used for gradient-based design optimisation Runs.
        message: str, optional
            A setup message that will appear in the Run log.
    """

    # initalise setup_data keys
    response = {}

    message = f"{datetime.now().strftime('%Y%m%d-%H%M%S')}: Setup completed."
    print(message)
    response["message"] = message

    return response
from datetime import datetime
from pathlib import Path


def compute(
    inputs: dict = {"design": {}, "implicit": {}, "setup": {}},
    outputs: dict = {"design": {}, "implicit": {}, "setup": {}},
    partials: dict = {},
    options: dict = {},
    parameters: dict = {
        "user_input_files": [],
        "inputs_folder_path": "",
        "outputs_folder_path": "",
    },
) -> dict:
    """Use this script to join the visual results (.frd files) of beam1 and beam2."""

    print("Post-processing started.")

    # get components inputs
    run_folder = Path(parameters["outputs_folder_path"])

    beam1_frd = inputs["implicit"]["files.beam1_frd"]
    beam2_frd = inputs["implicit"]["files.beam2_frd"]

    # check input files have been uploaded
    inputs_folder = Path(parameters["inputs_folder_path"])
    for f in [beam1_frd, beam2_frd]:
        if not (inputs_folder / f).is_file():
            raise FileNotFoundError(f"{f} file connection needed from beam component.")

    join_frd(
        inputs_folder / beam1_frd, inputs_folder / beam2_frd, run_folder=run_folder
    )

    resp = {}
    message = f"{datetime.now().strftime('%Y%m%d-%H%M%S')}: Post-processing completed."
    resp["message"] = message

    return resp


def join_frd(frd1, frd2, run_folder=None):
    """
    Append the nodes and elements from frd2 to those in frd1 and write the result in a new frd.
    """

    #### params ####

    # size of complete node sets
    # nsize1 = 201
    # nsize2 = 81
    nsizem = 261  # nsize1 + nsize2 - nsize_coupling_surface

    # time steps. set in precice-config.xml and .inp files
    nsteps = 50

    with open(frd1, "r") as f1, open(frd2, "r") as f2, open(
        run_folder / "beam_full.frd", "w"
    ) as fp:
        # copy frd header in new file
        for i in range(11):
            fp.write(f1.readline())
            f2.readline()

        # node header (change number of nodes)
        line_f1 = f1.readline()
        line_f1 = line_f1[:33] + str(nsizem) + line_f1[36:]
        fp.write(line_f1)
        f2.readline()

        # merging node lines. each iteration in the for uses a new line from frd2. lines in frd1 are advanced manually
        line_f1 = f1.readline()
        for line_f2 in iter(f2.readline, " -3\n"):  # -3 indicates end of line block
            # same node in both files (interface): write any (assuming their values are correct!!)
            if line_f1[:13] == line_f2[:13]:
                if line_f1[2] == "3":
                    continue
                else:
                    fp.write(line_f1)
                    line_f1 = f1.readline()
            # sorting lines according to node index
            elif line_f2 < line_f1:
                fp.write(line_f2)
            else:
                while line_f2 > line_f1:
                    fp.write(line_f1)
                    line_f1 = f1.readline()

                if line_f1[:13] != line_f2[:13]:
                    fp.write(line_f2)

        fp.write(" -3\n")

        # element header (change number of elements)
        line_f1 = f1.readline()
        line_f1 = line_f1[:34] + "32" + line_f1[36:]
        fp.write(line_f1)
        f2.readline()

        # merge element lines. assuming they are sorted and non-overlapping in frd1 and frd2
        for line_f1 in iter(f1.readline, " -3\n"):
            fp.write(line_f1)
        for line_f2 in iter(f2.readline, " -3\n"):
            fp.write(line_f2)
        fp.write(" -3\n")

        # merging blocks of lines for each step
        for i in range(nsteps):
            print("step", i + 1)
            # step header
            fp.write(f1.readline())
            f2.readline()
            line_f1 = f1.readline()
            line_f1 = line_f1[:33] + str(nsizem) + line_f1[36:]
            fp.write(line_f1)
            f2.readline()
            for j in range(5):
                fp.write(f1.readline())
                f2.readline()

            line_f1 = f1.readline()
            for line_f2 in iter(f2.readline, " -3\n"):  # -3 indicates end of line block
                # same node in both files (interface): write any (assuming their values are correct!!)
                if line_f1[:13] == line_f2[:13]:
                    if line_f1[2] == "3":
                        continue
                    else:
                        # this is an interface node for both beams. write the mean of the values in beam1 and beam2
                        mean_vals = [
                            (float(x) + float(y)) / 2.0
                            for x, y in zip(
                                [line_f1[13:25], line_f1[25:37], line_f1[37:49]],
                                [line_f2[13:25], line_f2[25:37], line_f2[37:49]],
                            )
                        ]
                        fp.writelines(
                            line_f1[:13]
                            + "{:12.5E}".format(mean_vals[0])
                            + "{:12.5E}".format(mean_vals[1])
                            + "{:12.5E}".format(mean_vals[2])
                            + "\n"
                        )
                        line_f1 = f1.readline()
                # sorting lines according to node index
                elif line_f2 < line_f1:
                    fp.write(line_f2)
                else:
                    while line_f2[:13] > line_f1[:13]:
                        fp.write(line_f1)
                        line_f1 = f1.readline()

                    if line_f1[:13] != line_f2[:13]:
                        fp.write(line_f2)
                    else:
                        mean_vals = [
                            (float(x) + float(y)) / 2.0
                            for x, y in zip(
                                [line_f1[13:25], line_f1[25:37], line_f1[37:49]],
                                [line_f2[13:25], line_f2[25:37], line_f2[37:49]],
                            )
                        ]
                        fp.writelines(
                            line_f1[:13]
                            + "{:12.5E}".format(mean_vals[0])
                            + "{:12.5E}".format(mean_vals[1])
                            + "{:12.5E}".format(mean_vals[2])
                            + "\n"
                        )
                        line_f1 = f1.readline()

            fp.write(" -3\n")

        fp.write("9999\n")  # EOF
10.3.4. PreCICE-driver#
In general, preCICE participants are launched in separate processes and the coupled simulation only starts once both processes have been launched.
To replicate this approach, we define a driver component that launches the two beam components in parallel using the python ThreadPoolExecutor class. Once both beam component compute threads complete, the driver launches the post-processing component execution.
Create the component:
Right-click in the workspace and select
Add Empty Node. Select the empty component to edit it.In the
Propertiestab, fill in the component name,precice-driver, and select the generic python driver APIgeneric-python3-driver:latest.Copy the contents of the
setup.pyandcompute.pyfiles from below into a text editor, save them locally. Then upload them under thePropertiestab.In the
Propertiestab check the box next to theDriveroption.Select
Save datato save and close the component.
import os
from datetime import datetime
from pathlib import Path

from component_api2 import call_setup

HOSTNAME = os.getenv("HOSTNAME")


def setup(
    inputs: dict = {"design": {}, "implicit": {}, "setup": {}},
    outputs: dict = {"design": {}, "implicit": {}, "setup": {}},
    parameters: dict = {
        "user_input_files": [],
        "inputs_folder_path": "",
        "outputs_folder_path": "",
    },
) -> dict:
    """A user editable setup function.

    Parameters
    ----------
    inputs: dict
        The component Inputs sorted by type (design, implicit or setup).
    outputs: dict
        The component Outputs sorted by type (design, implicit or setup).
    parameters: dict
        The component Parameters as defined in the component 'Parameters' tab.
        Includes the following special keys:
        'user_input_files': list of user-uploaded input file filenames
        'inputs_folder_path': path to all user and connection input files (str)
        'outputs_folder_path': path to component outputs folder (str)

    Returns
    -------
    dict
        dictionary of JSON-serialisable keys and values, including:
        inputs: dict, optional
            The setup function can assign values to input keys, but the inputs
            keys should not be modified.
        outputs: dict, optional
            The setup function can assign values to output keys, but the outputs
            keys should not be modified.
        parameters: dict, optional
            The setup function can add key/value pairs to the parameters dict,
            but the existing key/value pairs cannot be modified.
        partials: dict, optional
            The derivatives of the component's "design" outputs with respect to its
            "design" inputs, used for gradient-based design optimisation Runs.
        message: str, optional
            A setup message that will appear in the Run log.
    """

    print("preCICE problem setup started.")

    # get components inputs
    workflow = parameters["workflow"]

    for component in workflow:
        # launch each component setup in sequence
        message = {"component": component}
        _, component_dict = call_setup(message)

    response = {}

    # optional
    message = f"{datetime.now().strftime('%Y%m%d-%H%M%S')}: preCICE setup completed on host {HOSTNAME}."
    response["message"] = message

    return response
""" preCICE driver component that launches the FSI components."""

import os
from datetime import datetime
from pathlib import Path

from contextlib import redirect_stdout
from concurrent.futures import ThreadPoolExecutor

from component_api2 import call_compute

HOSTNAME = os.getenv("HOSTNAME")


def compute(
    inputs: dict = {"design": {}, "implicit": {}, "setup": {}},
    outputs: dict = {"design": {}, "implicit": {}, "setup": {}},
    partials: dict = {},
    options: dict = {},
    parameters: dict = {
        "user_input_files": [],
        "inputs_folder_path": "",
        "outputs_folder_path": "",
    },
) -> dict:
    """A user editable compute function.

    Parameters
    ----------
    inputs: dict
        The component Inputs sorted by type (design, implicit or setup).
    outputs: dict
        The component Outputs sorted by type (design, implicit or setup).
    partials: dict, optional
        The derivatives of the component's "design" outputs with respect to its
        "design" inputs, used for gradient-based design optimisation Runs.
    options: dict, optional
        component data processing options and flags, inc. : "stream_call",
        "get_outputs", "get_grads"
    parameters: dict
        The component Parameters as returned by the setup function.

    Returns
    -------
    dict
        dictionary of JSON-serialisable keys and values, including:
        outputs: dict, optional
            The compute function can assign values to output keys, but the outputs
            keys should not be modified.
        partials: dict, optional
            The compute function can assign values to partials keys, but the
            partials keys should not be modified.
        message: str, optional
            A compute message that will appear in the Run log.
    """

    print("preCICE problem solution started.")

    # get components inputs
    workflow = parameters["workflow"]
    run_folder = Path(parameters["outputs_folder_path"])

    coupled_components = workflow[:-1]
    post_component = workflow[-1]

    with open(run_folder / f"run_driver.log", "w") as f:
        with redirect_stdout(f):
            with ThreadPoolExecutor(max_workers=2) as executor:
                # launch each component compute in separate thread
                msgs = executor.map(run_component_compute, coupled_components)
                errors = list(msgs)
                if errors and errors[0]:
                    raise ValueError(errors[0])

            # post-process results
            run_component_compute(post_component)

    resp = {}
    message = f"{datetime.now().strftime('%Y%m%d-%H%M%S')}: preCICE compute completed on host {HOSTNAME}"
    resp["message"] = message

    return resp


def run_component_compute(component):
    message = {"component": component}
    try:
        _, data = call_compute(message)
    except Exception as exc:
        print(f"Compute of {component} failed, input data was: {str(message)}")
        raise ValueError(f"Component {component} compute error.") from exc

    print(
        f"{datetime.now().strftime('%Y%m%d-%H%M%S')}: Completed compute for component {component}."
    )
10.4. Create the Connections#
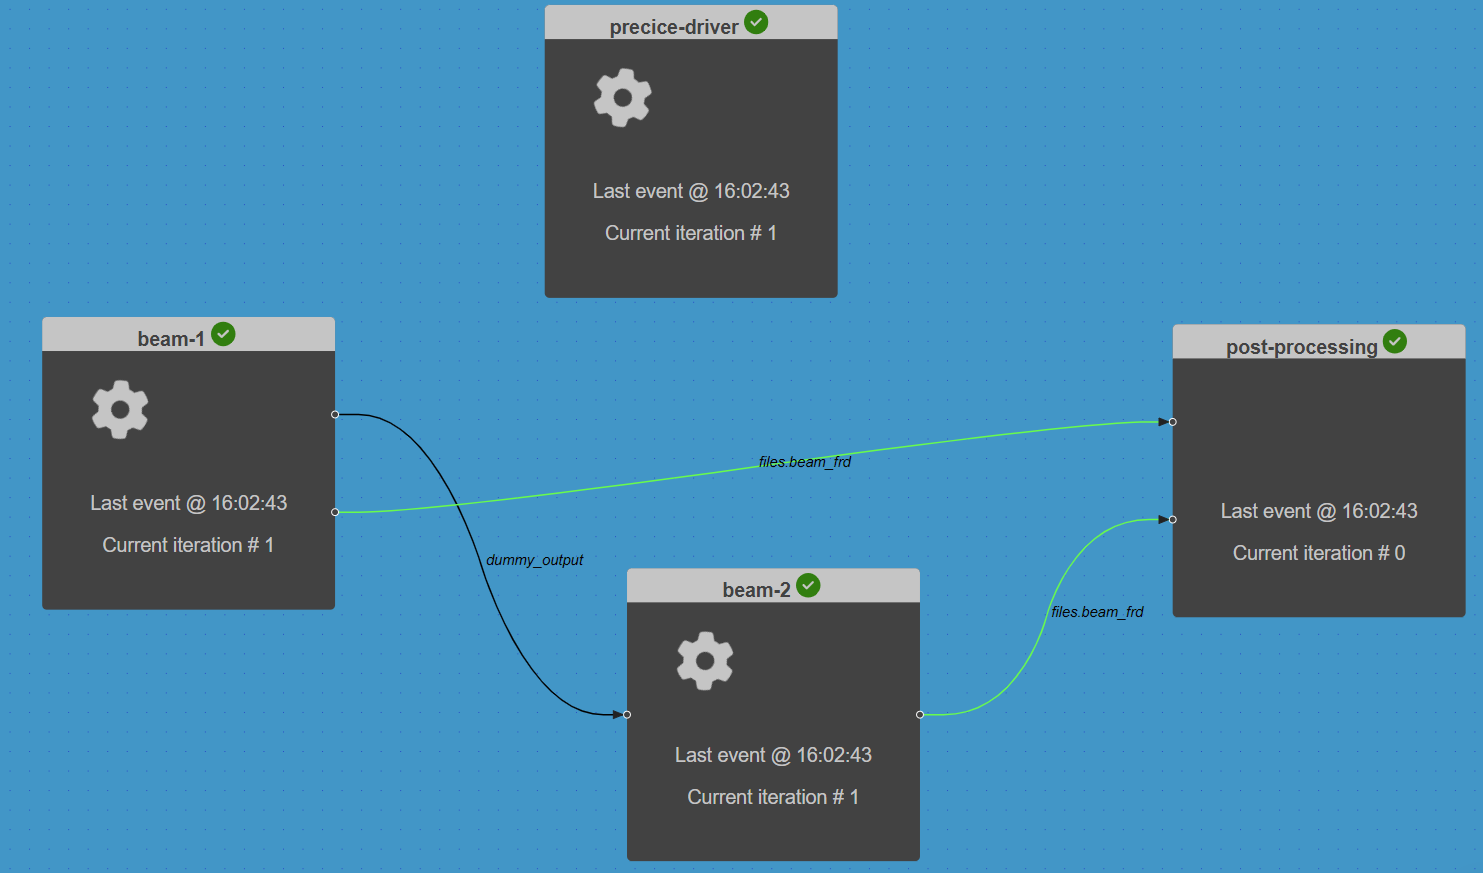
We can now connect the Components we created to ensure that outputs and inputs are passed between them as expected.
10.4.1. Dummy design connection#
This ‘Design variable’ type connection (black line) links the beam-1 component to the beam-2 component. It exists purely to satisfy the basic workflow requirements that simulation workflows should have a single starting component and that all (non-driver) components should be connected. In this case we choose the beam-1 component to be the start node.
Selecting the ‘dummy_output’ output handle of the beam-1 component and drag a line to the ‘dummy-in’ input handle of the beam-2 component.
10.4.2. File connections#
We create two file connections to transfer the beam analysis output files from each beam component to the post-processing component.
For the first connection, select the ‘files.beam_frd’ output handle of the beam-1 component and drag a line to the ‘files.beam1_frd’ input handle of the post-processing component.
Edit this Connection by selecting it in the workspace.
In the Properties tab change the Connection Type option from the default ‘Design variable’ to the ‘Implicit variable or file’ option by selecting the corresponding radio button.
Select Save data to save the change and close the connection interface.
Verify that the connection line colour has become green, which indicates an ‘implicit’ type data connection.
Repeat to create a similar connection from the beam-2 component.
10.5. Execute the workflow#
We can now execute the analysis Run by selecting the play symbol ▶ in the Run controls interface.
Once the run has started, each component will setup one at a time. The setup order is arbitrary. Then the compute on the driver, beam-1 and beam-2 will run in simultaneously until the coupled analysis completes and the post-processing component compute starts.
The Run should complete once the post-processing component compute has completed.
10.6. Inspect the outputs#
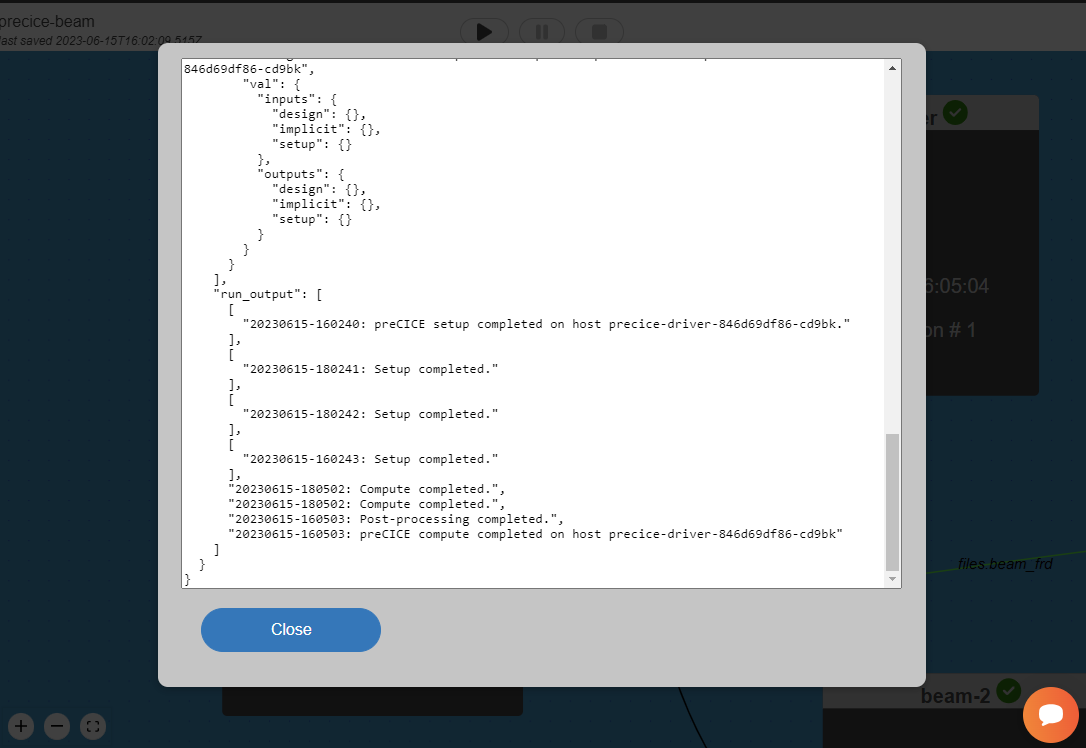
The Run log summarises the output of the components. Open the log by selecting View Log in the interface controls.
Scroll down to the “run_output” section to see that this contains the setup and compute function output messages from all four components (including the driver) in the order of execution as shown below.
You can download the session data and the Run log now by selecting Download from the interface controls.
To access the analysis output, select the post-processing component, navigate to the Log tab and select download files snapshot to download a zip folder containing the component files.
The outputs subfolder contains the consolidated CalculiX .frd output file with results from both beam components.
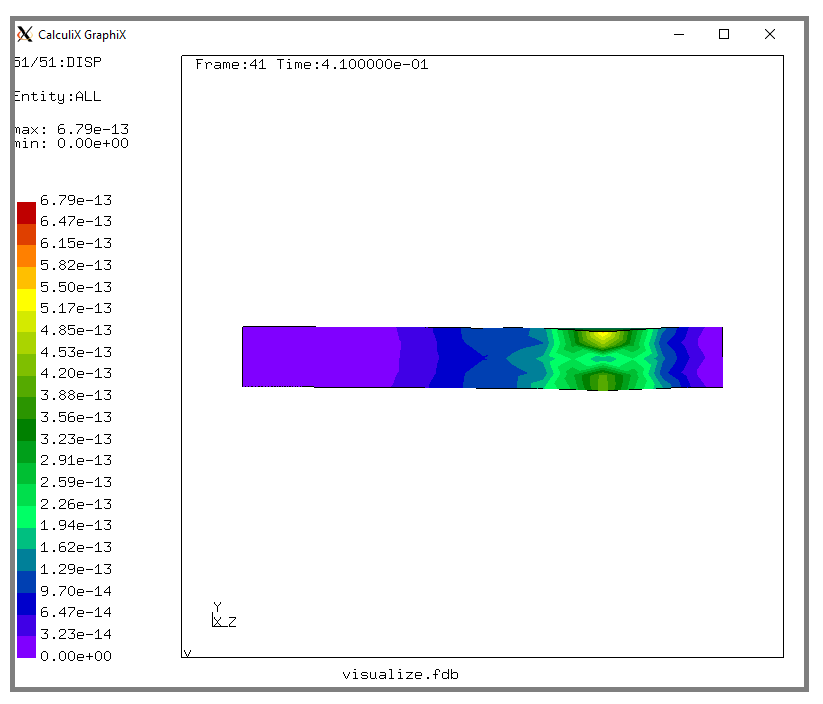
Local access to CalculiX GraphiX (CGX) is required to visualise the analysis output. Save a local copy of the following .fdb script in the same folder as the .frd file: visualize.fbd
In a command line execute: cgx -b visualize.fbd to view an animation of the magnified beam deflections.
10.7. Clean-up#
Delete your workflow by selecting Open in the interface and then select the Delete button for the loaded workflow.
It may take a minute or so for the Cloud session to be reset.
